Monday, February 25, 2019

Royal Naval Air Service Armoured Car Section/Division Collar Badge - A Semi-Forensic Analysis

Paralleling the popularity of collecting the six battalion cap badges of the World War I Royal Naval Division is collecting the affiliated insignia of the Royal Naval Air Service Armoured Car Section, which was soon expanded into a Division. This principally consists of the collar badge (“dog”), with limited variants, which are frequently mistaken and referred to as a cap badge.

As is the case with the battalion cap badges, the collar dogs have provided fertile ground for unscrupulous entrepreneurs to exploit the demand provided by beginning, as well as even advanced collectors, who have not conducted in-depth research or obtained specimens with impeccable provenance.

In assessing the authenticity of a genuine collar dog look for the following details.
• In the copy the letter “R” in RNAS is very close, if not almost touching the left hand edge of the armored car’s turret. In the originals there is a space.
• In the copy the dimpling on the front surface area of the badge is very pronounced, if not almost rough. In the originals this surface is smoother to both the touch and appearance.
• On the originals the lugs are consistently spaced, directly above the wheels and level with the top of car’s body.
• Of the originals there are apparently two types, one with voided crown, one non-voided crown, with a slight variance in size and weight:
Voided 49.32mm x 40.48mm and 52.85 g
Non voided 48.38mm x 41.72mm and 53.05 g
A smaller size original also exists with a variance in dimensions:
One being 25mm wide x 30mm tall.
The other cited as an o/r collar, being 17.07mm x 30.55mm.
 • Depending on the manufacturer’s dies there is another variance in the originals of two types; termed by some collectors as a 'Low' bonnet & tray and a 'High' bonnet & tray. As best determined this refers to the depth and curvature shown on the reverse side. Copies tend to have the high characteristic. 
• Copies tend to have thin/skinny lettering, and poor definition in the crown and jewel detail.
• Originals all have lugs, not sliders.
• Originals have a rich dark matte finish in a range of shades, but certainly not a shiny or brassy appearance.   

Again, as is typically the case, best assurance is well established provenance.

The following three badges are classic counterfeits, because of several of the above cited details.


Based upon the same set of authenticating criteria the following badges have a high probability of being original and genuine.


The following badge is a known genuine variant, probable officer's collar dog.


The following image not only shows the badges being wore, but it also shows the man on the left wearing the distinctive ammunition pouch issued with the Webley Scott .455cal. Self-loading Pistol MkI Model 1912. Note the absence of the set of cartridge loops on the flap and the squarer shape of the pouch compared with the man on the right. See; http://arnhemjim.blogspot.com/2016/05/tell-it-to-marines.html for details.


Another image showing a group of officers of the R.N.A.S. Armoured Car Section/Division wearing both types of collar insignia.


Thursday, February 21, 2019

1st Canadian Armored Carrier Regiment Cap Badge - A Semi-Forensic Study

As would be expected due to the uniqueness of the unit, its small size, and its short span of existence, the cap badge (as well as the collar devices) of the 1stCanadian Armored Carrier Regiment (1 CACR) have fallen victim to replicater’s skills.

The first image is a side-by-side comparison of a genuine badge on the left and a reproduction on the right, as well as showing both the front and rear of the badge. The originals are lugged with the orientation being N-S.


Another very clear set of images of a counterfeit badge, which recently sold for $550.00 USD.


W.J. Miller of the British and Commonwealth Military Badge Forum has recently provided an excellent analysis comparing one of the original WWII badges to what he diplomatically defines as a “post-war badge”, i.e.,counterfeit/fake. His analysis is herein acknowledged and gratitude extended for its use. The badge was manufactured by J.R. Gaunt & Son of London, from a design originated by the regiment’s commanding officer. The presented image size is a compromise between clarity (resolution) and the physical size of the image.


A pair of what are to believed to be a correct/genuine pair of collar dogs for the regiment.


Friday, February 15, 2019

The 1st Airborne Division’s 75mm Pack Howitzers at Operation Market-Garden

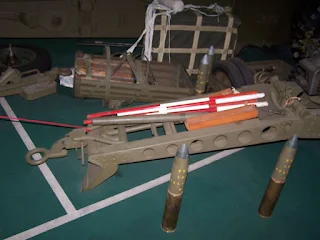
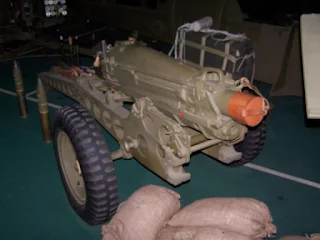
The principal artillery support organic to the 1st Airborne Division was the 1st Airlanding Light Regiment RA. Before restructuring and expanding into a regiment in February 1943 the unit had been equipped with obsolete 3.7in mountain ‘screw gun’ howitzers. These were replaced with the American 75mm M1A1(on M8 carriage (Airborne), with other minor modifications) Pack Howitzer. 24 of these new howitzers, originally designed in 1920, were organized into 3 batteries with each battery having two troops of four guns each. The following video is a walk-around of the gun; https://www.dailymotion.com/video/x2v7d6i.

Basic Specifications:
Manufacturer : US Ordnance Dept
Calibre : 75mm
Length : 12' 0"
Width : 3' 11"
Height : 2' 10"
Weight : 1339 lbs
Elevation : -5º to +45º
Range : 9,760 yards (8,790 meters)
Rate of Fire : 3-6 rounds per minute


It should be noted that in this series of photographs the carriage axle and wheels are in the traversing, or transport position, rather than the deployed or firing position.

Each gun was structured as a team. Each team was carried in two Horsa gliders. In one glider was a single gun, a jeep, an ammunition trailer, a gun commander (sergeant) and three members of the gun detachment. The following image is a detailed annotated load diagram.


 A second Horsa carried a second jeep, two ammunition trailers, an NCO and one other member of the gun detachment. Collectively the three trailers carried 137 rounds of ammunition (125 HE, 6 armour piercing, and 6 rounds of smoke (white phosphorous). In addition other glider loads included an addition jeep and trailer (other equipment), a motorcycle, and five or six men. The gunfire control liaison officers, signallers, and observation post personnel, were all trained parachutists who jumped with the battalions they were designated to support. These personnel were designated the 1st Forward Observation Unit Royal Artillery (Airborne) with an allowance of 20 officers and 84 NCOs and Enlisted.

The following is an excerpt from an excellent article appearing in the October 2007 issue of World War II Magazine entitled Gunners at Arnhem, by LtCol Thomas G. Bradbeer, USA, for which both acknowledgement is made and gratitude extended.

"On 17  September 1944, the first day of the operation, fifty-seven gliders carried the regimental headquarters and the 1st and 3rd batteries to Arnhem. The 2nd battery and the remaining men of the regimental headquarters were on the second day's lift.

With only three of the regiment's men travelling in the gliders, the two pilots stayed with the guns as drivers and to provide local protection, until the rest of the regiment assembled. Immediately after landing the 3rd Battery set up their gun line to the east of landing zone 'Z'. Meanwhile, the 1st Battery set up between the 3rd and the village of Wolfheze. Both were on call to support the 1st Parachute Brigade in their advance to the bridges, and the 1st Airlanding Brigade defending the landing zones.

In the morning of the second day, 19 September, in order to support the paratroopers in Arnhem, the guns had to move to a new position beside the church in Oosterbeek. The batteries were set up on the slight high ground that existed to the north-east and north-west of the church. At the Arnhem road bridge, the 2nd Parachute Battalion, commanded by Lieutenant Colonel John Frost, and some supporting units, were under attack by the reconnaissance battalion of the 9th SS Panzer Division, which was attempting to force a crossing. The regiment's guns were called into action and caused significant damage to the un-armoured vehicles, armored cars and half-tracks. Later they targeted German mortars firing at the 1st Parachute Battalion trying to fight through to the bridge in Arnhem. Their guns were also called upon to break up German attacks on the landing zones, still defended by the 1st Airlanding Brigade, which were in danger of being overrun. When the thirty-three gliders of the 2nd Battery that were on the second lift, arrived from around 15:00, one of their guns was damaged on landing and had to be left behind.  By that afternoon, the attempt to fight through to the 2nd Parachute Battalion at the Arnhem bridge had failed and the remnants of four battalions involved started arriving at the regiment's position."  

With LCOL John Frost’s 2nd Battalion, plus limited additional personnel, deployed in a defensive perimeter surrounding the north end of the Arnhem road bridge by the second day of the operation, the CRA (Commander Royal Artillery), LCOL R.G. Loder-Symonds DSO, MC, DSC,  and Commander of the Light Regiment RA, LCOL W.F.K. Thompson MBE, DL, had established an artillery park deployed around the Hartenstein Hotel in Oosterbeek, approximately three miles west of the Arnhem road bridge. In this position all three batteries were heavily engaged in continuous fire missions in direct support of the beleaguered parachute and airlanding battalions. The following image shows the approximate deployment of the individual guns. As can be seen in the diagram 22 out of the 24 guns arrived safely. One gun was damaged in glider landing, and the other was lost in flight to German flak. The positions of the two 17 Pdr Anti-tank guns covering any possible approach of German armor along Benedenorpsweg should also be noted.


Continuing from LtCol Bradbeer's narrative;
"On 20 September the division had been forced into a perimeter around Oosterbeek. The regiment was provided with local protection by five flights of the Glider Pilot Regiment. A group made up from the remnants of the 1st Parachute Brigade known as Lonsdale Force was to their right. While on the left was 'D' Company, 1st Battalion, Border Regiment. All that morning the Germans using tanks, self propelled artillery and infantry attempted to break through the British line and reach the regiment's guns from the east.

On 21 September, the fifth day of the operation, the Germans again attacked from the east and got within 300 yards (270 m) of the guns. Engaged in hand-to-hand fighting, infantry support was requested and the guns were firing at point blank range. German artillery attacked the gun line killing and wounding a number of men. Amongst the wounded was the commanding officer, Lieutenant-Colonel Thompson. One of the men defending the guns was Major Robert Cain who was part of Lonsdale force. Cain was wounded disabling a Tiger tank, after which he brought one of the regiment's guns forward to finish it off. Cain was later awarded the Victoria Cross, for this and other actions during the battle. By the end of the days fighting the regiment's stock of ammunition was running out.

By 22 September, XXX Corps had advanced close enough to Arnhem for their artillery to participate in the battle. But it was the 1st Airlanding Regiment's guns that broke up a German attack on the glider pilots positions just after 07:00 that morning. The following days took on the same pattern until the night of 25/26 September, when the remnants of the 1st Airborne Division were withdrawn south of the River Rhine. The gunners fired their remaining ammunition and then disabled the guns, so they could not be used by the Germans. Of the regiment's 372 men who went to Arnhem, 136 were evacuated, 200 were reported missing and thirty-eight were killed." 

The guns essentially remained in the above diagramed location for the duration of the operation, until there was no ammunition and the guns were “spiked” (disabled and breechblocks removed). In addition to the surviving anti-tank guns and PIATs, the 75 mm howitzers even saw limited direct fire missions over open sights against armored attacks. It suffices to say that the great majority of the last rounds fired in anger in the period 23-25 September, were AP (armor-piercing) at point-blank ranges. Here are three of the iconic photographs taken during the height of the action within the artillery park.


This author has not been able to find accurate records of precisely how many rounds were fired by the 75mm howitzers at Arnhem, but by deduction from the following data a reasonable estimate can be established. An error in accuracy of the count is inherent due to weight differential between the type of round.
137 rounds (carried as allowance in the trailers of each gun) X 22 guns (number safely arrived, excluding any additional rounds salvaged from glider loads of 2 guns) = 3014 rounds.
480 rounds delivered in the recorded loads of 3 Hamilcar gliders (30 panniers with gross weight of 350 lbs/pannier (300 lbs payload), 16 rounds/pannier, each round weighting 18 lbs 4oz.).
Only 1220 rounds based on recorded resupply collected from 18 - 23 September. (This is out of 19,170 rounds recorded dropped). The composition of these rounds was:
M48 (HE) - 960
M54 (HE, Fuzed) - 50
M64 Smoke (WP) - 120
M66 (Armour Piercing) - 120 
Estimated total number of rounds fired = 4714 rounds


It should be acknowledged and gratitude expressed for the amount of information contained in this article which came from the book, The Gunners at Arnhem, Wilkinson P.W., Spuurwing Publishing, East Haddon, Northampton, 1999, ISBN 0-9535754-0-3. Lieut Peter "Sam" Wilkinson MC served with the Light Regiment RA at Arnhem. In addition to the Military Cross he was promoted to Captain in October 1944, shortly after the battle. 

Although not contemporary the following are excellent images of remaining 75mm M1A1(on Carriage M8 (Airborne)) Pack Howitzers. Current U.S. designation is M116.


For those readers who may be interested in an even more detailed account of the action of the 75mm pack howitzers during Operation Market-Garden the following book is highly recommended; Arnhem Bridge Target MIKE ONE, An Illustrated History of the Ist Airlanding Light Regiment RA 1942-1945, North Africa-Italy-Arnhem-Norway, Truesdale, D., Cornelissen,M., Gerritsen, R.N. Sigmond Publishing (2015), Netherlands, ISBN/EAN; 978-90-812703-6-6.