Thursday, October 13, 2011

The Other Webley - Limited Standard Semi-Automatic Pistol of the Royal Navy & Marines

When most people think of a classic ‘Webley Pistol’, even those who are reasonably knowledgeable in small arms, it’s typical that it is the large frame Webley revolver (Full British Ordnance nomenclature; .455 in. Pistol, Revolver, No.1, MkVI), not a semi-automatic pistol. However, at the turn of the twentieth century, the same time frame as the introduction of the Colt .45 cal. M1911, the British gun manufacturer Webley & Scott also introduced a series of self-loading (semi-automatic) pistols in a range of calibers. The heaviest of these weapons being the .455in. Pistol, Self-loading, Mk I., Model of 1912. With a magazine capacity of 7 cartridges, a unique characteristic of this pistol is that it will chamber the standard .45 cal. ACP round (Not recommended due to excessive headspace). Another dangerous characteristic is that its significantly more powerful cartridge will chamber in a .455 in. Webley revolver, and if fired will severely crack, if not blow out the side, of the cylinder wall.

Cut-away drawings of the Webley .455 in.
Pistol, Self-loading, Mk I, Model of 1912 

The following are a series of close-up photographs showing both sides of the weapon, and a unique demonstration model which at the time resided in the Pattern Room, Enfield Lock. Acknowledgement and gratitude for the imagery is given to the book, 'Small Arms in Profile', Volume 1, General Editor, A.J.R. Cormack, Doubleday & Co., Garden City, N.Y., 1973, ISBN 0385 07887 0.


The following table is included for those readers who may have an interest in comparing the ballistic characteristics of the .455 in. Webley to the .45 cal. Colt, as well as the 9 mm and .380 cal. cartridges of WWII (Click on chart to enlarge image):

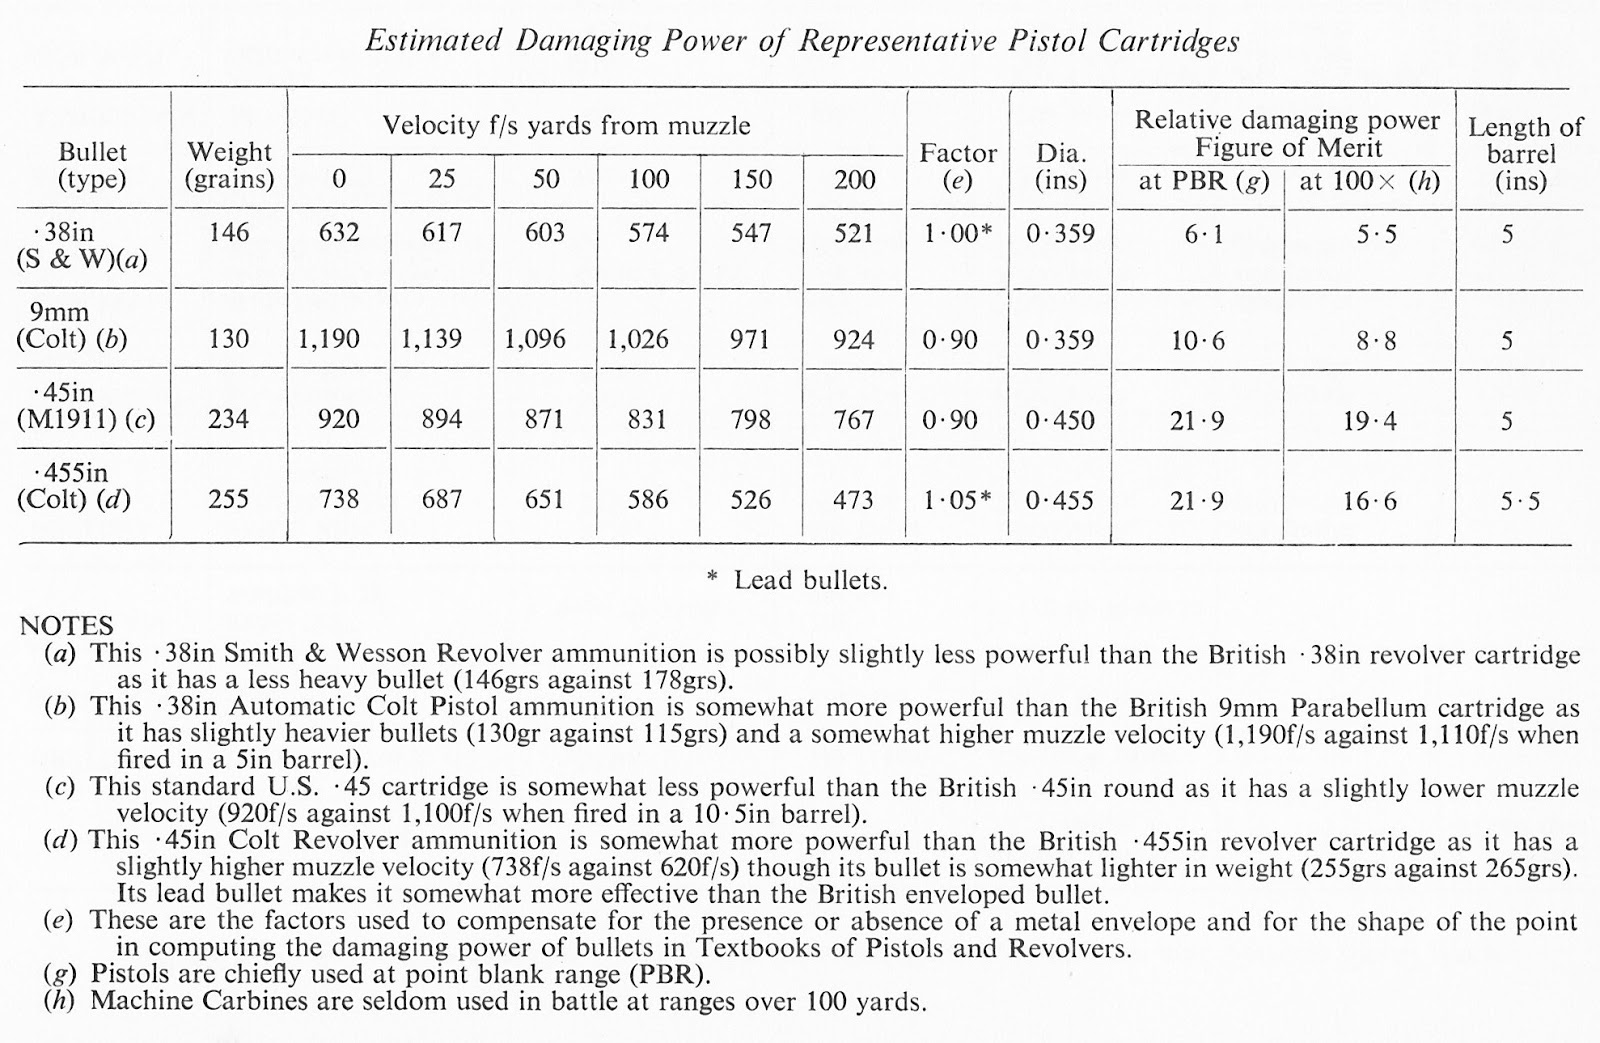
Table of Ballistic Characteristics of Various WWII Pistol/Revolver
Cartridges

The weapon was eventually procured by the British War Office, and the Royal Navy, as a limited standard. Records show that the first issue was 100 pistols to the Royal Horse Artillery in 1913. Subsequently it was accepted into the Royal Navy and Marines on 14 May 1914, and by the fledgling Royal Flying Corps on 26 April 1915. In addition to government production the weapon was commercially produced in a very limited quantity of 1248 pistols. At the time of World War I British Army officers had the prerogative of  private purchase of their personal sidearm, and several availed themselves of this particular semi-automatic pistol which was identical to the Royal Navy model.

One officer to do this was Lt Col  V C Thistlethwaite, 1st 7th Battalion Cheshire
Regiment. The photographs which follow are of this weapon which can be seen
as ascribed on the side to this officer. In addition to his pistol, which in and of
itself is rather rare, are its rare canvas covered leather holster together with an
earlier dated pouch of cow hide, a compass and an identity bracelet, all marked
to Lt Col Thistlethwaite.

Right hand side of the Webley .455 in. Pistol, Self-loading,
Mk I, Model of 1912; Note size of the receiver block and
trigger group. (Click to enlarge this image as well as others)

Left-hand side of the same weapon

A Top view

The kit of LCol. Thistletwaite

Equally rare are the accessories that were used with this gun. One was the web
holster manufactured by Mills Equipment Co., Ltd., as can be seen in the
following two photographs, as well as the web magazine pouch, also
manufactured by Mills, which carried two magazines, shown in the next
two photographs. Even though virtually identical in configuration to the
equally rare magazine pouch for the 9mm Inglis Browning (introduced in 1944)
it is dated 1940, but could fit the magazines of a .45 cal., M1911 or 1911A1.
There were in fact a limited number of M1911A1's re-chambered in .455 in.

Issue web holster for the Webley .455 in.
Pistol Self-Loading, Mk I; Note large top
section of holster built to accommodate the
 pistol's size and unique shape.

Back side of the standard issued holster. The
Mills Equipment Co. name and date are on the
inside of the flap.

Front of the double magazine pouch

Rear of magazine pouch showing Mills
Equipment Co. stamp and date

In addition to the issued holster I believe there were several commercially produced variants which were available for private purchase. One such example of an original holster recently appeared on e-Bay, and in a very active auction finally went for $255.00 USD.

Front view of holster for Webley-Scott Pistol,
Self-Loading, .455 cal. Model of 1912 and 1913
Note external pocket for spare magazine

Back view of same holster

View of flap and interior of the same holster

Judging from the leather, color, and design, it is believed that this holster could well have been manufactured to be compatible with the standard British Army Sam Browne belt of the day.

Individuals who are fortunate enough to have either a commercial or military version of this pistol in their collection should not despair. Jerry Lee, the owner of 'What Price Glory', a firm catering to re-enactors, has commissioned a replica of another variant of the holster, which meets and exceeds the requirements of the most discerning customer. The holster is a glove fit. As indicated in its description, it's also a perfect fit for the classic Colt semi-automatic pistol; .45 cal. (.455 cal.) M1911 or M1911A1.  In my personal opinion this holster in form, fit, function, quality and price, is a superior piece of gear and a great buy ($48.00 USD). The pair of brass 'D' rings incorporated in its design for optional use with a shoulder strap, and flap retaining strap, more closely follows the configuration of holsters intended for the Webley Revolver (Pistol, No.1 Mk VI, .455cal.) I'm familiar with. The only possible addition to the holster I could possibly suggest, is the placing of a flat washer (on the underside for added support) between the brass retaining button, and the screw that holds it to the flap. Am including 'What Price Glory' web address in the Links. but to find the holster directly, go to, http://www.whatpriceglory.com/shopexd.asp?id=5028&bc=no, or look for the holster under 'New Arrivals (British).

(Author's Note: Subsequent to writing this article, another source for a holster has been discovered. For the died-in-the wool purist a museum quality replica of the original Royal Navy procured and issued holster of 1912 is available. See the article "Tell It to the Marines" elsewhere in this blog for information on the products of the Military History Workshop of Cornwall, England.)

New construction replica of holster for Webley-Scott
Pistol, Self-Loading, .455cal., Models 1912 Mk I N
and Model 1913 

Exploded parts diagram of Webley-Scott semi-automatic
pistol, cal.455, Model of 1912, Mark I Navy.


In order to correctly field strip the pistol please use the following procedure graciously provided by one of the readers of this blog;

"First unload the pistol and remove the magazine. Pull the slide back 3/4 inch and press in the right hand side main spring catch (its just behind the trigger close to the slide; #35 in parts diagram). With the tension now taken off the slide you can push out the captive slide retaining pin from the left (its just above the slide release button, close to the ejection port; #43 in parts diagram). The barrel and slide will now slide forward and separate for field cleaning. For reassembly you slide the barrel in its 45 degree slots into the slide. slide this assembly onto the frame. pull the slide back 1/2 an inch from the battery position and push in the slide retaining pin. Pull the slide fully to the rear to release the main spring catch. Job done. And do pay particular attention to Jim's advise on the hard rubber grips. These pistols are now fetching £2500+ (2012) so are expensive to break."


For those who may be interested additional information on this weapon can be found in an addendum to this page; http://arnhemjim.blogspot.com/2013/02/the-other-webley-addendum.html


Saturday, October 8, 2011

Duke of Edinburgh’s Own Volunteer Rifles (South Africa) Cap Badge - A Semi-Forensic Study

Recently while reading an extensive thread on the British & Commonwealth Military Badge Forum on a member’s example of this cap badge, I remembered that I had the same badge in my limited collection. As an exercise, somewhat analogous to self-administered surgery, I decided to try and evaluate my own badge, as well as in parallel, submitting photographs to the forum for expert opinions. In that way hopefully I will have an objective critique of my analytical capabilities.

Not being an expert either in military cap badges, photography, or computers, did not deter me, as I thought it could prove an interesting learning experience. With acknowledgement to certain members of the forum, I’m taking the liberty to use photographs of some of specimens which they have submitted for appraisal. The principal challenge, however, is the fact that no one can provide an established genuine specimen of the 1898-1903 version of the badge to use as a benchmark. One extremely knowledgeable individual on the badge forum has stated, ‘they have been faked to death and back to life again, I've never seen a genuine one, not that I can remember, anyway !’

The first is an example of a genuine badge, which dates from before 1898 (at which time the royal duke’s coronet was added to the top of the badge). My badge with the coronet, and the others presented, all date from between 1898 and 1903, and are in white metal. In 1903 the badge was further modified to be made only in gilt or brass.

Observing the reverse of the pre-1898 badge, the following features can be seen:
            A crisp clean die strike of the entire body (particularly note lettering and
            belt fittings.
            Clean sharp edges to all elements of the ‘star’.
            A voided center.
            Note clean, straight, attachment of footless copper lugs.
            (Click on any of the images to enlarge)

The reverse of a genuine pre-1898 Duke of Edinburgh's
 Volunteer Rifles cap badge prior to the addition of the Duke's
Coronet.

Looking at the front (obverse) of the badge, one can observe the following details:
            Clarity and regularity of all elements, particularly the lettering and
            belt buckle and tip details.
            Note regularity of the pebbled background of belt surface behind
            the lettering.
            Fine regular detailing of the edging around the elements of the ‘star’.

The front of the same badge showing the crisp definition
of the die strike in all details.

The next badge is allegedly from the 1898 – 1903 period with the duke’s coronet and in white metal. It is the one I have in my own collection, and the only badge in the entire group which I am willing to definitely pronounce as a restrike or copy, for all of the following reasons:
            Lack of a full crisp die strike.
            Center of badge is not voided (Not certain on this feature).
            Slight copper hue discerned on reverse, indicating the badge
            is possibly plated.
            Flaw in die is visible on left upper and lower square elements of the ‘star’.
            North/South, East/West elements of star die cut straight without crisp
            contouring to the pointed ends of all elements of the star.
            The Maltese cross on top of the coronet is either ill-defined or badly worn.

Positive attributes of the badge, however, include the following:
            Inside base of crown has striations.
            Thistle leafs are well defined.
            The background of the belt surface behind the lettering is pebbled.
            Reasonably clear definition in both the lettering and belt details.

The reverse of a 1898-1903 specimen showing
less than a clean crisp die strike

The front of the same badge showing reasonable
definition of detail suggesting a restrike rather
than a totally new copy. 

For direct comparison, the following photograph shows a cap badge from the same period but note the difference in details:
            Although a reverse photograph of the badge is not available, it appears
            to have sharper detailing around all the edges of the badge.
            The center of the badge is voided.
            The details of the belt buckle and tip are well defined.
            The background of the belt surface behind the lettering is not pebbled.
            Inside base of crown missing striations.
            Irregularity in shape and spacing of lettering (between DUKE and OF,
            and in EDINBURGH'S [G H] as examples).
            Thistle leafs not well defined.

Another specimen of the same badge which while
 correctly voided shows other flaws.

The next example is apparently a fairly recent acquisition by a member of the forum, which was presented for evaluation (lack of sharp focus in the photography may be a compounding issue), and displays the following characteristics:
            A shiny, almost anodized, front surface. Does not look like white metal.
            The badge is non-voided (Not certain on this feature).
            The entire area where the coronet is integrated with the rest of the badge
            appear rough and ill-defined.
            It appears to have sharp detailing around all the edges of the badge.
            The holes in the belt appear to be ill-defined.
            The Maltese cross on top of the coronet is either ill-defined or badly worn.

Still another example of the badge with a different
set of design details which render it dubious.

The final badge specimen is I believe post-1903 and executed in brass. Although of later issue and well worn, it has some positive attributes:
            Even though dirty, it appears to have a clean die strike, note letters,
            belt fittings and coronet in particular.
            Appears to have sharp definition around all the edges of the badge.
            Regularity in the spacing of the lettering.
            However, it is not voided, and may have been issued that way, as
            Rosignoli shows it as not voided in his book.

The reverse of a post-1903 version of the badge struck in
brass with a clear die strike, a good indicator of authenticity.

The front of the same badge, while showing both patina and
wear, still has a fairly sharp definition in its details.


It will be very interesting to learn of expert opinions on the badges which have been presented, as to how many details have been identified, and what other additional in-accuracies exist in each badge.


Saturday, September 17, 2011

General Aircraft GAL 49/50 Hamilcar-The Other WWII British Assault Glider

Although the WWII Airspeed AS.51 Horsa assault glider was the most prolific of the allied glider aircraft which augmented the parachute elements of the British 1st and 6th Airborne Divisions it remained for another glider, the General Aircraft GAL 49/50 Hamilcar, to deliver the heavier loads which would provide extra muscle  to the lightly armed paratroops and airlanding forces. It was the heaviest of allied gliders and the only one capable of carrying a tank.

More importantly for the airborne forces it was capable of carrying the Ordnance QF 17 pdr Anti-tank Gun, its Morris C.8/AT 30cwt Quad Field Artillery Tractor (FAT), basic ammunition load, and complete gun crew from an Airlanding Anti-tank Battery, Royal Artillery, all in a single load. This capability provided a rather nasty surprise to the most heavily armored German tanks, even the Tiger I (max. frontal armor, 100 mm). The gun was capable of penetrating 118 mm of armor plate at 1000 yd, and with the introduction in July 1944 of an Armor Piercing, Discarding Sabot (APDS) round, 231 mm (9.1 in.) of armor plate at 1000 yd. (more than enough to 'put paid' to even the Tiger II).

The first prototype (GAL 49) flew on 27 March 1942. A total of either 344 or 410 (depending on sources) Hamilcars had been built when production ended in 1946, at a cost of £50,000 per glider. As was the case with the design of the Horsa, construction of the Hamilcar was almost entirely of wood, taking full advantage of Britain's 'cottage industry', aluminum being in short supply. (Most of the images can be enlarged by clicking on them.)

A contemporary detailed cut-away drawing of the prototype
General Aircraft GAL 49 Hamilcar I Glider with acknowledgment
to Creative Cutaways and The Aeroplane Spotter

A later equally detailed cut-away drawing of the GAL 49
Hamilcar Glider showing a Tetrarch Mk VII ICS Tank as carried
with acknowledgment to Flight Magazine

Annotated detailed cut-away drawing of the cargo box of the
General Aircraft GAL 49 Hamilcar Glider 

A scaled 3-view of the General Aircraft GAL 49 Hamilcar Glider
(Color of lower fuselage should be matte black)

The relatively clean aerodynamic shape of this WWII assault glider seen at a distance belies the size of this leviathan. With a wingspan of 110 ft (33.53 m) and length of 68 ft (20.73 m) it was only slightly larger than the Horsa, but its cargo box was significantly more voluminous, accommodating over twice the payload. The Hamilcar glider’s empty weight was 18,400 lb (8,346 kg) with a maximum takeoff weight of 36,000 lb (16,329 kg) (7 tons of cargo), as compared with the Horsa’s weight of 8,370 lb (3,804 kg) and maximum takeoff weight of 15,500 lb (7,045 kg).

The General Aircraft GAL 49 Hamilcar Heavy Assault Glider
at a distance very deceptive in size

The following are selected pages from the Pilot's Notes for the HAMILCAR MK I Glider, A.P. 2219-A P.N. 2nd Edition, October 1944, showing detailed drawings of the cockpit of the glider, with annotations.


The Hamilcar was cleared and capable of carrying any one of the following payloads:

            1 Tetrarch Mk VII ICS (infantry close support) light tank (15,680 lb)
            1 US Locust M22 light tank (16,400 lb)
            2 Universal (Bren) Carriers (17,000 lb)
            3 Rota Tank trailers with 4 Airborne supply panniers
            1 Mortar carrier (9,280 lb) with 8 motorcycles (2,880 lb)
            1 17 pdr Anti-tank gun (4,624 lb) with modified Morris C.8/AT 30cwt
               Quad Tractor (empty weight 7,496 lb (3,400 kg), prime mover)
            1 25 pdr Field gun with modified tractor
            2 Daimler Armored Scout cars
            1 D4 Small Bulldozer (15,920 lb)
            1 Universal (Slave battery) Carrier with 1 Jeep
            48 Airborne supply panniers for equipment and ammunition
            1 Scraper with equipment plus 1 Fordson tractor for pulling scraper
            1 Grader with 9 Airborne supply panniers
            1 40mm Bofors Antiaircraft gun (Self-propelled)
            Bailey pontoon bridging equipment
            1 HD10 or HD14 bulldozer (in three Hamilcars)

Load test showing a Universal (Bren) Carrier emerging from
the Hamilcar Glider

Another load test showing an American Locust M22 Light Tank

The Locust M22 Light Tank, with tank crew in flight
 positions, and tank properly chocked and shackled in the glider

The Tetrarch Mk VII ICS Light Tank being disembarked from
the Hamilcar glider during load qualification trials


Field Marshal Montgomery observing the loading trials
of the Tetrarch Mk VII ICS Light Tank in a Hamilcar glider

A Morris C.8/AT 30 cwt Quad Field Artillery Tractor (FAT)
in unmodified configuration, for glider flight it would
be stripped of its canvas top and framing

Rear view of the Ordnance QF 17 pdr Anti-tank Gun a
massive artillery piece (weight in action, 4,624 lb)

The 'business end', i.e. muzzle, of the 17 pdr Anti-tank Gun


Close-up side view of a pair of 17 pdr Anti-tank Guns

A group of three 17 pdr Anti-tank rounds;
 the one on the left being the Armor Piercing
 Discarding Sabot (APDS) configuration

Only the heavy bombers of the Royal Air Force were capable of towing a fully loaded Hamilcar glider. These included the Sterling, Lancaster or Halifax bombers. Towing speed was 150 mph (240 km/h) and the normal approach speed was 100 mph (130 km/h), with maximum never exceed diving speed of 187 mph (300 km/h).

Hamilcar gliders participated in Operation Tonga (in support of the D-Day invasion of Normandy, Operation Overlord), Operation Market-Garden (Arnhem) and Operation Varsity (Crossing of the Rhine). They were principally flown by personnel of the Glider Pilot Regiment, Army Air Corps (AAC). The Tetrarch tanks were manned by the  6th Airborne Armoured Reconnaissance Regiment, Royal Armoured Corps. An excellent book about this unit, as well as the Hamilcar and Tetrarch is; Airborne ARMOUR, K. Flint, Helion & Co., Ltd., Solihull West Midlands, 2004, ISBN 1 874622 37 X.

Detailed multi-view of the Tetrarch Mk VII
ICS Light Tank showing all tactical signs

Side elevation and top plan view of the
Tetrarch Mk VII ICS Light Tank

With special thanks and acknowledgment to Howard J. Curtis, the following photograph was taken of a display at the National Tank Museum, Bovington, UK, of one of the few remaining Tetrarch Mk VII ICS light tanks, within the partial fuselage of a Hamilcar glider (note the glider's cockpit up and behind the tank).

Tetrarch Mk VII ICS Light Tank shown in its storage position
on the forward cargo deck of  the remains of a fuselage from a
General Aircraft GAL 50 Hamilcar I Glider.

Another view of the same tank showing the close clearance
of the treads to the edges of the cargo deck

Again the same Tetrarch Mk VII but slightly off angle, and
showing Hamilcar cockpit above and aft

This image shows the foremost bulkhead of the Hamilcar
fuselage where the nose section was hinged


The most intact remaining example of a Hamilcar Glider can be found at the Museum of Army Flying, Middle Wallop, Hampshire, UK. Our sincere thanks and acknowledgment to Peter Clarke for this great photograph of the display. To give you a better appreciation of size note the mannequin of a glider pilot up by the rear cockpit seat.

The forward fuselage section of General Aircraft GAL 50
Hamilcar Glider, particularly noting the size of the wing spars.
The gun in the foreground is a Soviet ZPU Quad 14.5mm
 mobile AA gun, obviously not associated with the Hamilcar.

For more details regarding the General Aircraft GAL 49/50 Hamilcar glider, its development and operational use see; http://en.wikipedia.org/wiki/General_Aircraft_Hamilcar, and the Para Data link of the Parachute Regiment and Airborne Forces Museum, Duxford listed on this blog.


Portions of the following contemporary newsreel footage are included on other pages of this blog. Thought however they should be also incorporated on this page in order to provide continuity and completeness. It is listed here as a link as it can't be directly integrated, apparently due to copyright issues. The link is; https://www.youtube.com/watch?v=EHo3pSmknHY

Following are two fairly obscure photographs of a piloted 1:2 scale "proof of concept" model built by General Aircraft, Ltd., designated the GAL 50, and used to establish the feasibility and aerodynamic characteristics of the Hamilcar glider prior to building the first full scale prototype. The photographs were probably taken sometime in 1941.