This post is intended to link a previous post on the General Aircraft GAL-49/50 Hamilcar Glider with the specific employment of the Hamilcars during Operation 'Market Garden' at Arnhem 17-25 September 1944, by the British 1st Airborne Division. Readers who may be interested are referred back to the previous post; http://arnhemjim.blogspot.com/2011_09_01_archive.html. All photographs and drawings can be enlarged by clicking on them.


The following data was obtained from two excellent books; The Gunners at Arnhem, P. Wilkinson, Spurwing Publishing, East Haddon, Northton, 1999, ISBN 0-99535754-0-3, and Glider Pilots at ARNHEM, M. Peters & L. Buist, Pen & Sword Military, South Yorkshire, 2009, ISBN 184415763-6, as well as original source documentation including;


 |
| An excellent scale model of a Hamilcar glider showing its size compared with a Universal Carrier and 6 pdr Anti-tank Gun |
The following data was obtained from two excellent books; The Gunners at Arnhem, P. Wilkinson, Spurwing Publishing, East Haddon, Northton, 1999, ISBN 0-99535754-0-3, and Glider Pilots at ARNHEM, M. Peters & L. Buist, Pen & Sword Military, South Yorkshire, 2009, ISBN 184415763-6, as well as original source documentation including;
GLIDER PILOT
REGIMENT OPERATION “MARKET” APPRECIATION AND OPERATIONAL INSTRUCTIONS BY
COMMANDER GLIDER-PILOTS, Col. G.J.S. Chatterton DSO at H.Q. 38 Group, Royal
Air Force, 10 Sept. 1944, TOP SECRET.
OPERATION
“MARKET” Instruction No. 1 (with Annexures), LGen F.A.M. Browning, Commander
British Airborne Corps, 13 September 1944, TOP SECRET.
After Action Reports of Units of the Glider
Pilot Regiment: Operation “MARKET” Air and Operation “MARKET” Ground, Commander, Glider Pilot Regiment, October 1944.
Given
specifically different mission requirements from the 6th Airborne
Division at Normandy, the 1st Airborne Division utilized the
Hamilcar gliders primarily to transport the newly introduced 17-pounder Anti-tank
guns and their prime movers into the
landing zones at Arnhem, in order to provide a significantly improved
capability against the increased armour of the newer German Tiger tanks. Unlike the 6th Airborne Division at Normandy, the 1st did not utilize either the Tetrarch Light
Tank used during Operation Overlord, or the M22 Locust Light Tank used during Operation Varsity in 1945.
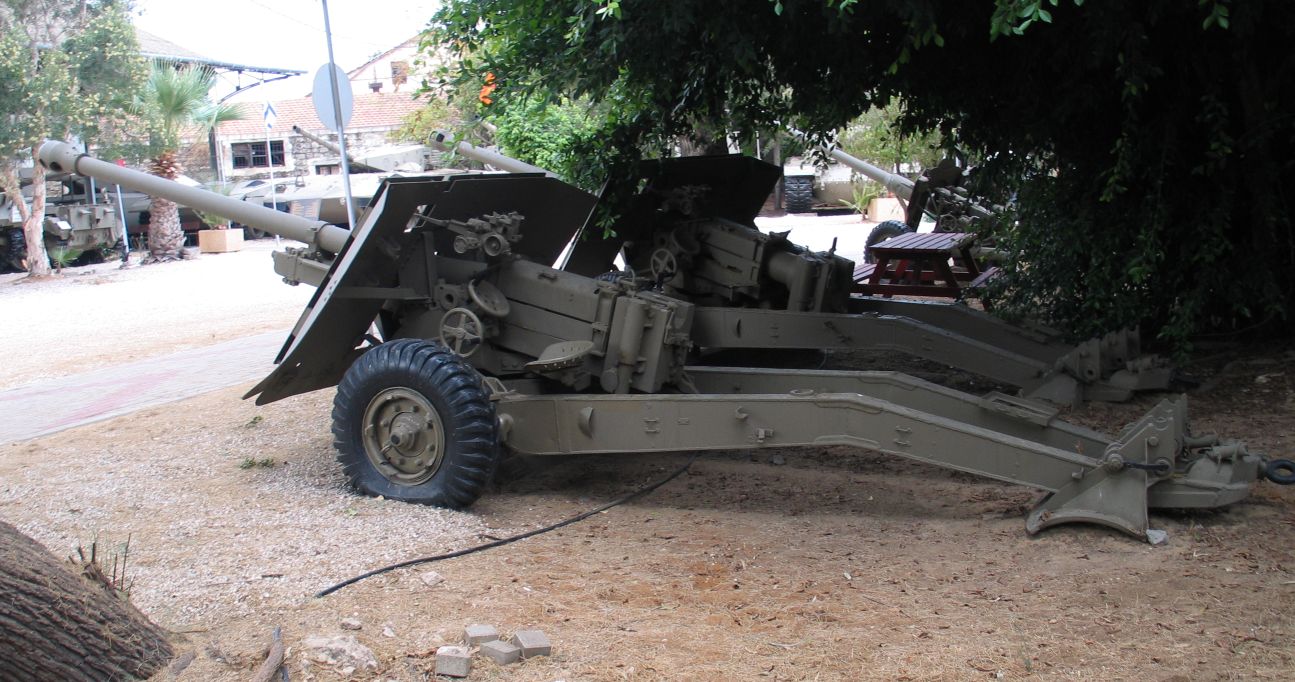 |
The Ordnance QF 17 pdr Anti-tank Gun a
massive artillery piece (weight in action, 4,624 lbs)
|
 |
| The "business end" of the 17 pdr Anti-tank Gun showing both the barrel length and large protective shield |
The Order of
Battle of the 1st Airborne Division consisted of two troops of the 1st Airlanding Anti-Tank Battery, initially under the command of Maj Ian Toler
(later of the Glider Pilot Regiment at Arnhem), and two of four troops of of the 2nd (Oban) Airlanding Anti-Tank Battery, Royal Artillery, commanded by Maj A F Haynes. This totaled a complement of
16 of the 17-Pounder guns.
Because of both
size and weight the 17-pounders could only be carried in the Hamilcar gliders, along
with their towing vehicles, specifically modified Morris Commercial Quad
Tractors (C.8/AT 30 cwt). These tractors also carried the gun crews and an initial ammunition
allowance consisting of twenty rounds of armor piercing and ten rounds of discarding sabot. On 17 September the 17-pounders of
the 1st Airlanding Anti-Tank Battery flew in 8 Hamilcars from
Tarrant Rushton. Two Hamilcars encountered landing problems on the soft Dutch heath resulting in the loss of two 17-pounders as well as the majority of the crews.
The cavernous interior of the Hamilcar glider can be seen in the following photographs of its empty interior, taken from the official RAF Airborne Forces Manual. The first looking forward and the second aft. The cargo box of the Hamilcar was comparable in size (however somewhat squarer in configuration, affording more clearance) to that of the Douglas C-47A Skytrain (known to the British as the Dakota), the principal military cargo aircraft of the USAAF and RAF during World War II (See third photo). It could, however, carry a payload of approximately 17,500 lbs (6,000 lbs more than the C-47A).

The eight 17 pounders of the 2nd (Oban) Airlanding Anti-Tank Battery were scheduled to fly from Blakehill Farm in 8 Hamilcar gliders on the second day of the operation, the 18tth of September, as an element of the 4th Parachute Brigade Group. Due to in-flight accidents and enemy action, on or near, the landing zones, only 5 of the gliders with their 17 pounder loads successfully landed. The majority, if not all, of the Hamilcar flights into Arnhem were flown by "C" Squadron of the Glider Pilot Regiment. The tug aircraft for all of the Hamilcar gliders were Halifax bombers flown by pilots of 38 Group RAF.
The following drawing is of a correctly (+/- 2% error ) scaled Morris C.8/AT Quad Tractor and 17 pdr Anti-Tank Gun superimposed on the interior cargo compartment dimensions of the GAL-49 Hamilcar I Glider. One assumption is made; being that the gun was loaded and flown with its trail eye made up to the pintle of the gun tractor for both facilitation of load-out, as well as speed/efficiency of exit upon landing. The drawings of the Hamilcar are from RAF Air Publication 2453D, dated October, 1944. Given the overall length of the tractor and gun at 29' 8.75" and the cargo compartment length at 32' 3.5", an allowance of 2' 6.75" remains with the wheels of the gun resting at the very ends of the vehicle rails. Also note that the vehicle rails are adjustable to accommodate varying axle widths of loads. Apologies, it is the author's error in scaling the tractor and gun, or placement of the pair, which accounts for the slight off-set of the gun carriage wheels from the vehicle rails shown in the glider's floor plan. The width of the glider's nose door is 7' 7". The width of the tractor is 7' 1/4"! So much for the calculations of a former U.S. Navy combat cargo officer.
 |
A Morris C.8/AT 30 cwt Quad Field Artillery Tractor
(FAT)
in unmodified configuration, for glider flight it
would be
stripped of its doors, side panels, and windshields |
 |
A group of three 17 pdr Anti-tank rounds;
the one on the left being the Armor
Piercing
Discarding Sabot (APDS) configuration
|
The cavernous interior of the Hamilcar glider can be seen in the following photographs of its empty interior, taken from the official RAF Airborne Forces Manual. The first looking forward and the second aft. The cargo box of the Hamilcar was comparable in size (however somewhat squarer in configuration, affording more clearance) to that of the Douglas C-47A Skytrain (known to the British as the Dakota), the principal military cargo aircraft of the USAAF and RAF during World War II (See third photo). It could, however, carry a payload of approximately 17,500 lbs (6,000 lbs more than the C-47A).

 |
| It can be seen how the aft fuselage section could easily accommodate the long barrel of the 17 Pdr Anti-Tank Gun |
 |
| Interior view of C-47A looking aft with cargo/paratroop exit door on the right |
The eight 17 pounders of the 2nd (Oban) Airlanding Anti-Tank Battery were scheduled to fly from Blakehill Farm in 8 Hamilcar gliders on the second day of the operation, the 18tth of September, as an element of the 4th Parachute Brigade Group. Due to in-flight accidents and enemy action, on or near, the landing zones, only 5 of the gliders with their 17 pounder loads successfully landed. The majority, if not all, of the Hamilcar flights into Arnhem were flown by "C" Squadron of the Glider Pilot Regiment. The tug aircraft for all of the Hamilcar gliders were Halifax bombers flown by pilots of 38 Group RAF.
The following drawing is of a correctly (+/- 2% error ) scaled Morris C.8/AT Quad Tractor and 17 pdr Anti-Tank Gun superimposed on the interior cargo compartment dimensions of the GAL-49 Hamilcar I Glider. One assumption is made; being that the gun was loaded and flown with its trail eye made up to the pintle of the gun tractor for both facilitation of load-out, as well as speed/efficiency of exit upon landing. The drawings of the Hamilcar are from RAF Air Publication 2453D, dated October, 1944. Given the overall length of the tractor and gun at 29' 8.75" and the cargo compartment length at 32' 3.5", an allowance of 2' 6.75" remains with the wheels of the gun resting at the very ends of the vehicle rails. Also note that the vehicle rails are adjustable to accommodate varying axle widths of loads. Apologies, it is the author's error in scaling the tractor and gun, or placement of the pair, which accounts for the slight off-set of the gun carriage wheels from the vehicle rails shown in the glider's floor plan. The width of the glider's nose door is 7' 7". The width of the tractor is 7' 1/4"! So much for the calculations of a former U.S. Navy combat cargo officer.
 |
| Elevation and plan view of the Hamilcar glider cargo compartment depicting placement of C.8/AT Quad Tractor and 17 pdr Anti-Tank Gun |
 |
| Cross-sections of the cargo compartment (Note: Due to different sized original drawings the scale differs, but obviously correct dimensions are indicated.) |
The following photograph is unique in several aspects. First it is one of the few known showing the loaded position of the C.8/AT Mk III (Airborne Configuration) with its wheels and bonnet (hood) clearly protruding into the nose section of the Hamilcar glider. Secondly, showing then Maj-General Richard Nelson "Windy" Gale MC, G.O.C. 6th Airborne Division, to the right of King George VI, and given the caption, it would indicate that at least a few of the then very new 17 pdr Anti-Tank Guns were flown into Normandy at D-Day, 6 June 1944. On the right fender of the vehicle, although partially obscured by a blackout light fitting, appears to be the tactical marking (white '47' imposed on red over blue square) of either the 2nd, 3rd, or 4th Airlanding Anti-Tank Batteries, which were elements of the 6th Airborne Division. Finally the lashed-down position of the vehicle would tend to reinforce the previous supposition regarding the placement of both tractor and gun.
 |
| The photograph shows the C.8/AT directly under the fuselage frame corresponding to Section B-B shown above. |
 |
| Another view of the rigging of a 40mm Bofors SPG Morris C.9/B during load certification trials. |
 |
| This is a rare photograph of the heavily modified C.8/AT Mk III (Airborne configuration) used to tow the 17 pdr AT Gun, and carried with the gun in the Hamilcar Glider (Courtesy of the Airborne Forces Museum Para Data web page) |
 |
| A fully and correctly restored Morris C.8/AT MkIII (Airborne configuration) with an Ordnance QF 17 pdr Anti-Tank Gun in tow, note extensive modifications and tactical markings as compared with a previously shown unmodified vehicle |
There were also 5 Hamilcar gliders in the 1st Lift, and 4 in the 2nd Lift, assigned to carry a payload of 2 Universal Carriers each, for a total of 18 carriers. In addition to their primary loads of heavy anti-tank artillery, there were 3 Hamilcar gliders, in both the 1st and 2nd Lifts, assigned to deliver bulk loads. Their specific loads are listed in a table below. The following are pages pertaining to Hamilcars, copied from the Annexures of an original copy of the Operatonal Order and excerpts from Appendices 8 and 9 of the book, Glider Pilots at ARNHEM. The latter two pages are of particular interest in that they detail; RAF Station of take-off, Specific Tug/Glider Configuration, RAF Squadron, Glider Pilot Regiment Unit, DZ/LZ(Drop/Landing Zone), Chalk No. of the Gliders, Embarked Airborne Unit/Payload, and which gliders aborted their flights.


The Directorate of Military Survey map used for Operation Market-Garden annotated with an overlay of all the planned drop and landing zones, the intended major unit perimeters, and other significant points of interest.

A contemporary photograph from 1944 superimposed on two differing scales of Google Earth, showing both Hamilcar and Horsa gliders on Landing Zones (LZ) X and Z west and northwest of Wolfeze. The second map gives a better appreciation of the distance (varying from 5 to 7 mi.) from the LZs to the main road bridge (primary objective) at Arnhem which appears in the upper right of the photograph where Eldenseweg crosses over the Neder Rijn. This factor was one of several critical flaws in the planning for the operation. For any reader who might be interested in a comprehensive analysis please see: http://arnhemjim.blogspot.com/p/operation-market-garden.html on this site. For a more interactive map of the entire area of operations see: http://www.gearthhacks.com/dlfile24751/Gliders-near-Wolfheze,-September-1944.htm. If inclined you can become a photographic intelligence interpreter/analyst, and carefully enlarge the image to the point where the Hamilcar gliders can be discerned from the smaller and more numerous Horsa gliders.


The following combat photograph, enlarged from the previous maps, shows one of the Hamilcar gliders having successfully landed and off-loaded its payload (Note nose door fully open and vehicle tracks), at either Landing Zone (LZ) X or Z near Wolfheze, northwest of Arnhem (see previous maps).

The following photograph shows eight of the Hamilcars on LZ "Z" from serial B-14 originating at RAF Tarrant Rushton. One glider, chalk No.319 shown at the top of the picture, flipped over on landing, killing one glider pilot, Sergeant Charles Brackstone, and seriously wounding the other, Staff Sergeant Jack Shaw. The payload, a 17 pdr and its C.8/AT Mk III tow vehicle of D Troop were lost.

This is a close-up photograph of the crashed and overturned Hamilcar chalk No. 319.


The following link shows a vintage 1943 British MOVIETONE News clip of the Hamilcar glider demonstration flight from take-off to landing, including the unloading of a universal carrier; http://www.liveleak.com/view?i=d99_1295756711 An alternate tactical/combat landing was not on the landing gear, but on the glider's 2 pair of skids. This eliminated the requirement (time delay) of releasing the hydraulic fluid from the oleo struts of the gear, affording immediate opening of the nose door and disembarkation of the payload. However the normal landing was on the landing gear, as evidenced from wheel tracks in the LZs. Why all the aircraft engine noise after the glider is cast-off in the film clip is unexplained.
In conclusion I would like to share a video of an interview with Brigader M.D.K "Mike" Dauncey DSO DL, Glider Pilot Regiment. As a young lieutenant, piloting a Horsa glider, he flew a jeep, 2 trailers, and associated personnel elements of The Airlanding Light Regiment, Royal Artillery into Landing Zone Z northwest of Arnhem (near Wolfheze). Given the Brigadier's oral history (see below) and the weight, space and balance limitations of the Horsa, it's not absolutely certain exactly what his payload was.

He in recent years wrote the forward to the book, The Gunners at Arnhem. He fought at Oosterbeek, was wounded, taken prisoner, escaped, and for his heroism was awarded the Distinguished Service Order. In the parlance of modern 'operators', he has "been there, done that"! Thank goodness someone has had the presence of mind to get an oral history from him before it's too late. The interview can be found at; http://kingscollections.org/servingsoldier/index.php?id=694. The payload of his glider would have probably looked very much like this, except for the absence of the 75mm Pack Howitzer, M1A1(M8 carriage) and the addition of a trailer (with full acknowledgement to the authors of Glider Pilots at ARNHEM).
The following is an excerpt which is credited from a Wikipedia article further detailing the employment of the Hamilcar gliders during Operation Market Garden;


 |
| Note orientation of the payload in the Horsa glider which was off-loaded from the rear by removal of the entire tail section |
The following is an excerpt which is credited from a Wikipedia article further detailing the employment of the Hamilcar gliders during Operation Market Garden;
"A lack of sufficient transport aircraft meant
that 1st Airborne Division would be dropped in three separate lifts over three
successive days. 1st Parachute Brigade and most of 1st Airlanding Brigade would
land on 17 September, 4th Parachute Brigade and the rest of 1st Airlanding
Brigade would land on 18 September, and on 19 September the Polish 1st
Independent Parachute Brigade would land, along with a supplies for the entire
division. The division would utilize
approximately 650 gliders during the operation, of which 39 would be Hamilcars. It appears that the Hamilcars that had been
utilized by 6th Airborne Division and subsequently abandoned in June had been
replaced, as records state that 64 of the gliders were available by September. Thirteen Hamilcars would be flown on 17
September and land in landing zone 'Z'. Eight of the gliders would carry
17-pounder anti-tank guns, their towing vehicles and crews, and the other five
would carry ten Universal Carriers, two apiece; the Carriers were to act as
transports for the airborne troops. On 18 September fifteen Hamilcars would
land in landing zone 'X'; eight would carry a 17-pounder anti-tank gun, their
towing vehicles and crews each, and the other four would carry eight Universal
Carriers, which would once again act as transport for the airborne troops that
were flown in. The final three were packed with ammunition and stores, as well
as a number of sappers
from the Royal Engineers;
these were experimental loads, as it was believed that the Hamilcar might be a
more efficient way of transporting supplies rather than the Horsa due to its
larger size.[60]
On 19 September, ten Hamilcars would transport American engineers who belonged
to the American 878th Aviation Engineer Battalion and their equipment, which
included bulldozers, cranes and graders; they were to construct
a forward airfield in landing zone 'W' after the gliders had been cleared away.
All fifteen Hamilcars which participated in the
first lift on 17 September arrived over the landing zones safely, but problems
were experienced when they came in to land. Two of the gliders landed on soft
ground, which caused them to rapidly decelerate; this, combined with the
majority of their equipment being in the front of the gliders, resulted in them
flipping onto their backs. Three of the pilots were killed and the fourth was
badly wounded and later taken prisoner, and several passengers were wounded;
the 17-pounder anti-tank guns on board the gliders were damaged beyond repair.
The rest of the Hamilcars landed successfully, although one overran the landing
zone and hit a railway embankment; this damaged the two Universal Carriers
being carried by the glider, although both were later salvaged. The lift on 18 September was delayed for
several hours due to poor weather conditions, and the glider force did not take
off until approximately 11:00. En-route to the landing zones, one Hamilcar was
forced to cast off and land at an airfield in England after its tow aircraft
developed engine trouble, and another ditched in the English Channel when its
tug developed engine troubles as well; both had been carrying 17-pounder
anti-tank guns. The rest of the Hamilcars encountered heavy anti-aircraft fire
as they landed, with several being hit. As a result, one Hamilcar landed short
of the landing zone after being hit in the wing, and another was forced to make
an emergency landing far from the landing zone after being hit; the stores,
pilots and passengers were captured by German forces shortly after the glider
landed. The rest of the Hamilcars landed successfully. The third lift on 19 September did not take
place due to weather problems, and because several of 1st Airborne Division's
landing zones had been overrun. Finally on 21 September the weather cleared,
but due to 1st Airborne Division's deteriorating situation it was decided that
the 878th Aviation Engineer Battalion would not be delivered. As such, only a
single Hamilcar accompanied 1st Polish Independent Parachute Brigade when it
dropped near the town of Driel; this was the same Hamilcar which had been
forced to land in England on 19 September when its tug had experienced engine
trouble. However, the tow rope between the glider and tug snapped over Belgium,
and it was forced to land near Ghent."
One of the tested and certified payloads for the Hamilcar was the Tractor, Light (5 tons), Caterpillar or International (manufacturers). With acknowledgement and gratitude to the Airborne Museum, Hartenstein, the following photograph shows a different, lighter, crawler bulldozer bearing the tactical markings of the 261st Field Park Company Royal Engineers. This unit was attached to the 1st Airborne Division, and landed by Horsa glider at Arnhem. The very fact that it was delivered by a Horsa glider, and not a Hamilcar, is in and of itself amazing.
(Editorial note: The author has to apologize for his previous ignorance, even initial disbelief. The true facts were pointed out by a very knowledgeable reader, Jimmy E., who cited the fact that the bulldozer was carried in by Horsa glider(s), not a Hamilcar! This fact would place it, in probably two loads in Horsa Chalk No.'s 950 - 969 (956, 964 aborted) which carried Equipment; det 261 Fd Pk Coy, RE. A rather tight fit to put it mildly! The bulldozer is an American Machine and Metals, Inc.; Tractor, Crawler, Gasoline; Clark CA-1, which would have required reassembly of the blade (from a second glider) upon landing. The driver has been identified as Sapper Meryn Potter, RE. The essential elements of this information have been corroborated by author and acknowledged expert on Arnhem, Niall Cherry. Acknowledgement and sincere gratitude to both Jimmy E. and Niall for this intriguing facet of history.)
The following photographs are of the actual restored tractor in the Hartenstein Museum, and another restored identical model CA-1 tractor. Of particular interest is the nameplate, and data (unfortunately the weight is not discernible, but physical dimensions are).


The part of LZ'Z' on which the diorama is based, still looks pretty much the same today as it did 70 years ago. Here is a picture of it. The road leads to the south across the LZ, on the left is Doorwerth Heath and on the right lay the fields preserved for the Keevil gliders.

With acknowledgement and expressed gratitude to Time Life, Inc., a newly rediscovered photograph of a Hamilcar glider, and another attributed to the Nico Braas Collection.


One of the tested and certified payloads for the Hamilcar was the Tractor, Light (5 tons), Caterpillar or International (manufacturers). With acknowledgement and gratitude to the Airborne Museum, Hartenstein, the following photograph shows a different, lighter, crawler bulldozer bearing the tactical markings of the 261st Field Park Company Royal Engineers. This unit was attached to the 1st Airborne Division, and landed by Horsa glider at Arnhem. The very fact that it was delivered by a Horsa glider, and not a Hamilcar, is in and of itself amazing.
(Editorial note: The author has to apologize for his previous ignorance, even initial disbelief. The true facts were pointed out by a very knowledgeable reader, Jimmy E., who cited the fact that the bulldozer was carried in by Horsa glider(s), not a Hamilcar! This fact would place it, in probably two loads in Horsa Chalk No.'s 950 - 969 (956, 964 aborted) which carried Equipment; det 261 Fd Pk Coy, RE. A rather tight fit to put it mildly! The bulldozer is an American Machine and Metals, Inc.; Tractor, Crawler, Gasoline; Clark CA-1, which would have required reassembly of the blade (from a second glider) upon landing. The driver has been identified as Sapper Meryn Potter, RE. The essential elements of this information have been corroborated by author and acknowledged expert on Arnhem, Niall Cherry. Acknowledgement and sincere gratitude to both Jimmy E. and Niall for this intriguing facet of history.)
The following photographs are of the actual restored tractor in the Hartenstein Museum, and another restored identical model CA-1 tractor. Of particular interest is the nameplate, and data (unfortunately the weight is not discernible, but physical dimensions are).


With acknowledgement and full
credit to Stefan Landman for his extensive and extremely accurate research, and
magnificent execution of a diorama of Landing Zone “Z”. See; http://www.network54.com/Forum/78970/thread/1411133406/Gliders+on+Landing+Zone+%27Z%27,+17+September+1944,
appearing on missing-lynx.com. The following map with detailed plots and
contemporary photograph chronicle the designated landing zone for a significant number of the
Hamilcar gliders landed. Stefan's diorama is discussed in detail in the following article within this blog; http://arnhemjim.blogspot.com/2015/10/landing-zone-z-wolfheze-netherlands.html .

The part of LZ'Z' on which the diorama is based, still looks pretty much the same today as it did 70 years ago. Here is a picture of it. The road leads to the south across the LZ, on the left is Doorwerth Heath and on the right lay the fields preserved for the Keevil gliders.


Although only deployed in very limited actual combat during Operation Varsity the M22 Locust Light Tanks were delivered by Hamilcar glider onto LZ 'P'. With acknowledgement and expressed gratitude to The Royal Air Force Museum in Cosford, Shropshire, the following is an excellent image of both during those load qualification trials;

For those individuals who might be interested in additional background information on the Hamilcar glider please see the following web site; https://everything.explained.today/General_Aircraft_Hamilcar/ .
13 comments:
Thank you so much for this article. We visited the Airborne museum in Oosterbeek today and were very much by the operation in general and the role of the gliders in particular.
what alteration has been made on the airborne 17 prdr as compared to the normal field artillery piece ?
I can't detect less shield plating or shorter gun carriage legs. So what is it ?
To ODDBALL SOK,
Having done due diligence research on the Internet prior to writing the article, I know there is no information regarding any specific airborne configuration modifications of the Ordnance QF 17 Pdr Mk I used by the 1st Airborne Division’s anti-tank gunners at Arnhem. Suffices I also reviewed my reasonably large personal reference library for further information. Unlike the 6 Pdr AT Gun, which was specifically modified in an ‘Airborne’ configuration, to the best of my knowledge the 17 Pdr was not. I will defer to any experts who may have further data.
The Hamilcar in the picture of C Squadron is my Grandfather's. S/Sgt Nicholas Ernest Brown. He is pictured directly in front of the chalked up name on the Glider which reads... "Nickys Heap". He swam the Rhine and made it back against all odds. Pilot. Soldier. Ive known no braver a man.
Re: The Hamilcar in the picture of C Squadron showing the tall man on the left of the picture as you look at it, in the beret, is my uncle, Serjeant John Gilbert Burge Glider pilot - he was lost on the Rhine crossing - was seen by his pal in front of him who had turned to see if he was ok. When his pal turned for the second time he had gone. A brave valiant man, who having previously been in the Metropolitan Police, had no need to volunteer but did so after bringing a dead mother and baby from a cellar in London.
Hi, great article! Regarding the 261st field park company tractor. I have read several books which mention one of these being at Arnhem. One of them is the 261st Park Company and the other is Martin Middlebrooks book about Arnhem/Market Garden!
The tractor was flown to Arnhem by Horsa glider.
It was possible to load the tractor with a special loading ramp. But this ramp could not be taken aboard the Horsa. It was decided to blow up the landing gear of the Horsa after landing so that the tractor would be closer to the ground. After that the tractor would drive straight through the side fuselage of the Horsa ,destroying the glider. After the landing the tractor was driven to Hartenstein and parked beside it. The stayed the whole battle there. A German cameraman made a recording near Hartenstein and the tractor appears a few seconds in vieuw. An article is written by the sociaty friends of Hartenstein museum. The Sapper who was the driver of the tractor gave the detailed information. Also a photo of a tractor fitted in a Horsa is shown.
Your Uncle was my grandfather's second pilot going into Arnhem i believe from his log book.
Many thanks for your great work of search. Just two little things. First I thought the Locust had been used at least during Operation Varsity and then I'm pretty sure that the vehicle on the picture with the mention "Another view of the rigging of a Morris C.8/AT Mk III" is a 40mm Bofors SPG Morris C9/B. Can you confirm this ?
Hello Anonymous,
Sincere apologies, my error regarding the combat employment of the M22 Locust Light Tank. Because of my primary personal interest, and resultant focus on Operation Market-Garden, I have not been as attentive to the other major airborne operations as I should be. Whatever source of information I used was incorrect. You are absolutely correct, Operation Varsity saw 4 Locust tanks of the 6th AARR (Airborne Armoured Reconnaissance Regiment) successfully delivered by Hamilcars on to LZ ‘P’, then proceeding to their RV. As you may well know, that was the remaining operational half of the original intended 8 tanks. I have the correct account in an excellent reference; Airborne Armour, Flint, K., Helion & Co. Ltd, West Midlands, 2004, ISBN 1 874622 37 X.
With regard to the Morris 30cwt AT, the original source photo was captioned Morris CT8, but given the two sponson supports (stowed on each front fender appearing, as upside down large pails) it was misidentified. You are indeed correct, though the basic bodies are similar, the vehicle shown is a 40mm Bofors SPG Morris C9/B. The photograph possibly having been taken when being certified as approved for carriage in the Hamilcar. See the list of authorized loads previously cited in another blog post;
Thank you very much. Your diplomatic tact, interest, and time and effort in citing these two errors is most sincerely appreciated, and with your permission I will be correcting both. That’s what blogs are all about. It’s infinitely better to be corrected by a sharp expert eye, than to be seen ignorant and dismissed.
Warmest regards,
Arnhem Jim
Arizona Territory
Hello
In the Wikipedia article about the Hamilcar it's says that an US Airborne Engineer Aviation Battalion, the 878th had to be sent to the LZ-W located between Son and St. Oedenrude(101st Airborne Division area)by ten Hamilcar. Due to bad weather the gliders never took off. But the 21st september the 1st Airborne Allied Army sent troops to prepare Keent airfiels (near Grave) for a huge resupply run. So my questions are which unit was sent to Keent, the 878th or the 876th (who also constructed an airstrip for gliders near Grave) ? And did they came by road or air ?
Thanks for your answers !!
Here is a link about the story of Keent airfield during Market-Garden : https://www.forgottenairfields.com/airfield-keent-503.html
Hello Achilles,
Unfortunately you have caught me by “my heel”. The most definitive reference I have is Glider Pilots at Arnhem, by Mike Peters and Luuk Buist. They have chosen to limit their scope of coverage to the lifts carrying the airlanding elements of the 1st British Airborne Division. Buist did author another book, The Royal Air Force at Arnhem - Glider and re-supply Missions in September 1944. Checked, currently sold out. You might want to keep an eye out for it; http://www.fortress-books.com/en/catalogue/military-aviation/the-royal-air-force-at-arnhem-glider-and-re-supply-missions-in-september-1944 The other definitive reference I’m aware of is; https://www.abebooks.com/9789080680814/Tugs-Gliders-Arnhem-Detailed-Survey-9080680818/plp Available, but the price is all but prohibitive ($500.00 +). Apologies for not being of more assistance.
Best regards,
Arnhem Jim
Hello Arnhemjim
I don't know if you already found this document but there is a very interesting part about Market-Garden :
https://web.archive.org/web/20160624044120/http://www.afhra.af.mil/shared/media/document/AFD-090602-016.pdf
Post a Comment